The following illustrations and text explain the common design details using eaves and verges that can occur on refurbishment and new work.
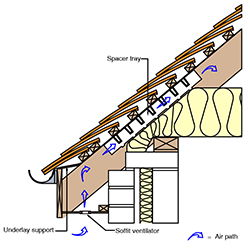
Eaves with over fascia ventilation
Set top of fascia board at correct level and fit ventilator in accordance with Manufacturers Recommendations.
Eaves courses of tiles should be at same pitch as general tiling.
If a sprocketted or bell-cast detail is used, then eaves courses should be no lower than the minimum recommended roof pitch.
Fix a plywood board or proprietary tray to provide continuous support to underlay to prevent water retaining troughs.
Fix a rafter spacer tray to provide a clear air path between underlay and insulation.

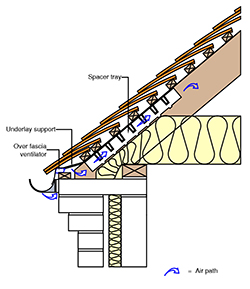
Eaves with soffit ventilation
Set top of fascia board at correct level. Eaves courses of tiles should be at same pitch as general tiling.
If a sprocketted or bell-cast detail is used, then eaves courses should be no lower than the minimum recommended roof pitch.
Fix a plywood board or proprietary tray to provide continuous support to underlay to prevent water retaining troughs.
Fix a rafter spacer tray to provide a clear air path between underlay and insulation.
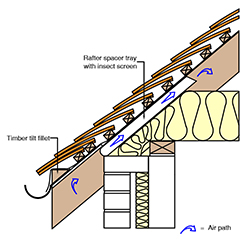
Open eaves with ventilating rafter tray
Fix timber fillet to set eaves courses of tiles at same pitch as general tiling.
If a sprocketted or bell-cast detail is used, then eaves courses should be no lower than the minimum recommended roof pitch.
Fix a screen to prevent ingress of birds, rodents and large insects etc, or use proprietary rafter spacer tray with integral screen to provide a clear air path between underlay and insulation.
Cottage eaves with over-fascia ventilation
Fix a timber batten to outer edge of masonry to provide fixing for over fascia ventilator.
Use correct thickness of timber to set eaves courses of tiles at same pitch as general tiling.
Fit ventilator in accordance with Manufacturers Recommendations.
If a sprocketted or bell-cast detail is used, then eaves courses should be no lower than the minimum recommended roof pitch.
Fix a plywood board or proprietary tray to provide continuous support to underlay to prevent water retaining troughs.
Fix a rafter spacer tray to provide a clear air path between underlay and insulation.
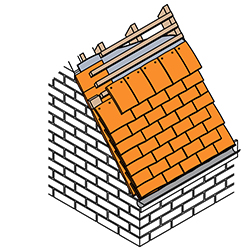
Bedded verge
Carry underlay 50mm onto outer leaf of gable wall.
Bed an undercloak of plain tiles laid face down with bottom ends exposed, projecting not more than 50mm beyond face of wall.
Carry tiling battens over undercloak and finish 100mm from verge edge.
Fix standard tiles and tile-and-a-half tiles in alternate courses.
Bed edge of verge tiles flush with undercloak on 75mm wide bed of mortar leaving the edges clean.
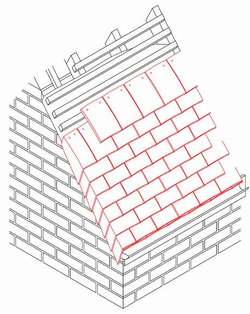
Cloaked verge I
Carry underlay over full width of gable wall and turn down 50mm behind cloaks.
Carry tiling battens over undercloak and finish flush with verge edge.
Fix cloaked verge tiles and cloaked verge half tiles in alternate courses.
Note: Cloaked verge tiles are handed and should be specified when ordering.
Left hand verge is illustrated.
Cloaked verge II
Carry underlay over full width of gable wall and turn down 50mm behind cloaks.
Carry tiling battens over undercloak and finish flush with verge edge.
Fix cloaked verge tiles and standard tiles in alternate courses.
Note: Cloaked verge tiles are handed and should be specified when ordering.
Left hand verge is illustrated.
