Top edge abutment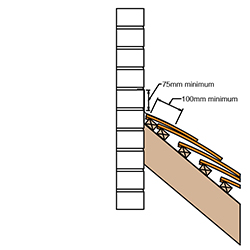
Turn underlay not less than 50mm up abutment. Lay tops tiles and nail as recommended by manufacturer.
Fix tiles close to abutment to enable a weatherproof junction to be formed by metal apron flashing.
Ensure metal flashing turns up abutment by minimum 75mm. The flashing should cover the tops tiles by a minimum 100mm.
If tops tiles are not used then the flashing should be extended to 150mm.
Ventilated top edge abutment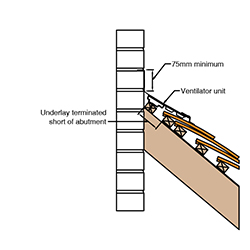
Ensure that an air gap is provided as recommended by ventilator manufacturer.
Lay tops tiles and nail as recommended by manufacturer.
Fix ventilator to enable a weatherproof junction to be formed by metal cover flashing.
Ensure metal flashing turns up abutment by minimum 75mm.
Side abutment with metal soakers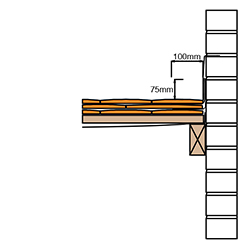
Turn underlay at least 100mm up abutment. Cut standard tiles and tile-and-a-half tiles as necessary and interleave with metal soakers to form a close weathertight abutment.
Form soakers with a 75mm upstand against abutment and fix by turning down over the head of each tile.
Dress a metal step flashing closely over the soakers with a lap of at least 65mm.
Change of pitch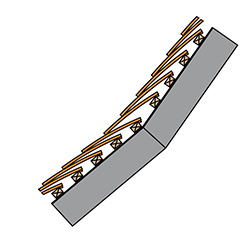
This detail does not usually require a metal flashing when plain tiles are used. Generally, the tiling continues in the usual way and sweeps around the change in roof pitch. Care should be taken to maintain adequate headlap.
Where the pitch change is significant it may be necessary to increase the batten depth (ie use a double batten) for the first course(s) at the steeper pitch.
Note: Always ensue that the lower roof is at or above the minimum recommended roof pitch for the tiles.
Mansard with mansard tiles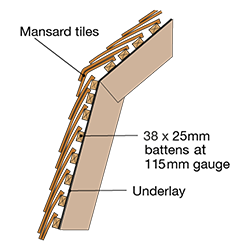
Ensure that a clear ventilation path is maintained from eaves to ridge where the insulation is positioned between the rafters.
Lap the roof underlay over the mansard underlay by a minimum 150mm.
Set out the tiling battens to ensure that a 65mm headlap is maintained for the mansard tiles.
Mansard tiles need to be specified for the particular roof pitches required.
Mansard with metal flashing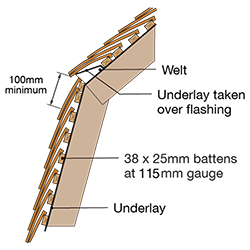
Fix continuous timber tilt batten at eaves to provide support for metal flashing and eaves course of tiles.
Ensure that a clear ventilation path is maintained from eaves to ridge where insulation is positioned between the rafters.
Lap roof underlay over metal welt and secure mansard underlay under tilt batten. Dress cover flashing over the top course mansard tiles by minimum 100mm and extending 150 to 200mm up the tilt batten.
Clip the bottom edge of the flashing in exposed locations.
Note: The use of mansard tiles should be encouraged wherever possible.