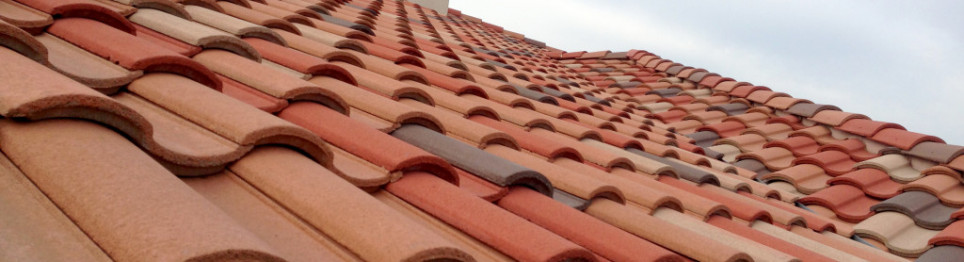
A roof valley is formed where two roof slopes come together. Its funcion is to collect and direct water into a gutter. It can be one of the most vulnerable parts of a roof’s weatherproofing, as it is prone to debris build-ups and poor drainage which can lead to water infiltration.
Some common valley installations are shown below:
Swept valley
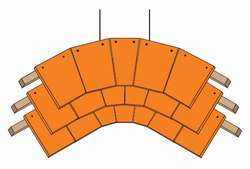
A swept valley detail should only be used on roof pitches of 45 degrees and above and where roof slopes of equal pitches meet.
If a swept valley is used on the main roof, extra tiles courses will be required at the top of the valley. This will mean that the ridge line must rise towards the valley top.
Therefore, there must be a matching swept valley on the opposite side of the roof.
Alternatively, a large, unsightly lead soaker would be required to weather the resultant gap at the top of the valley.
When tiling this type of detail it can be difficult, if not impossible, to always achieve the minimum 55mm side lap between courses. Where this happens, lead soakers must be inserted.
Alternatives to swept valleys are mitred valleys using metal soakers and purpose-made valley tiles.
Swept valley top detail
The ideal situation for this type of detail is, for example, a dormer, where the swept valley meets a ridge part way up a main roof slope. In this case, the upward curve of the tiling and ridge line can be absorbed in the main tiling courses above.
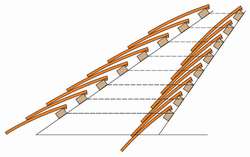
Laced valley
A laced valley det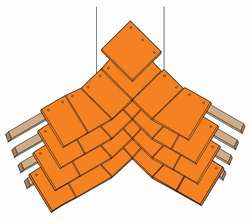 ail should only be used on roof pitches of 45 degrees and above and where roof slopes of equal pitches meet.
If a laced valley is used on the main roof, extra tiles courses will be required at the top of the valley. This will mean that the ridge line must rise towards the valley top. Therefore, there must be a matching laced valley on the opposite side of the roof. Alternatively, a large, unsightly lead soaker would be required to weather the resultant gap at the top of the valley.
Laced valley detail
The ideal situation for this type of detail is, for example, a dormer, where the laced valley meets a ridge part way up a main roof slope. In this case, the upward curve of the tiling and ridge line can be absorbed in the main tiling courses above.
The head of the valley may continue above the dormer ridge for a maximum of 3 courses before being absorbed into the main tiling.
The last ridge at the top of the valley must be cut to a taper to maintain a horizontal ridge line.
Mitred valley
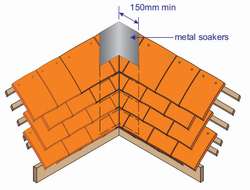
A mitred valley detail should only be used on roof pitches of 50 degrees and above and where roof slopes of equal pitches meet.
The maximum rafter length should be no more than 6 metres.
Mitred valleys should not be used where the valley receives additional water from a roof area above.
The length of each soaker will vary, depending upon the roof pitch. The minium width of each soaker is 150mm at each side of the valley.
Mitred valley with secret gutter
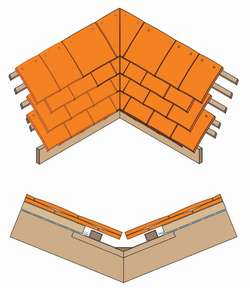
![]() This detail could be used where unequal roof pitches meet but should only be used on
This detail could be used where unequal roof pitches meet but should only be used on
roof pitches over 50 degrees.
This form of valley has the disadvantage of the risk of becoming clogged by debris -leaves pine needles etc.
There also exists the difficulty in constructing a sufficiently wide valley gutter for adequate water discharge whilst still being able to secure all cut tiles.
This type of valley detail has fallen out of favour in recent years and is rarely used.
Valleys with unequal roof pitches

If it is required to continue the tile courses in line around valley, and the roof pitches at each face are unequal, it will be necessary to set out the tile batten gauge on the lesser pitch first. Then, the battens on the steeper pitch can be fixed in line with the first battens. This will necessitate having a shorter gauge on the steeper side.
Lining up the tile courses in this way uses more tiles and is only for aesthetic reasons – it is not necessary technically.
It is only possible to use valley tiles for up to 5 degrees difference in pitch between the two roof faces.
![]()