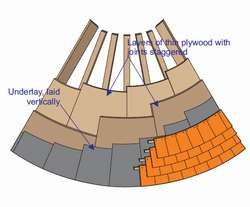
Conical tower with plywood skin
Conical roofs can be covered with layers of thin plywood to a depth of 25mm to maintain a smooth curve.
The underlay should be laid vertically, with vertical laps of 150mm and horizontal laps of 100mm.
To comply with the requirements of BS 5534 tiles should be fixed to timber battens. But for heritage and other traditional work tiles can be fixed directly to the plywood and suitable underlay.
Battens may be ‘scarfed’ at the back to enable them to be bent around the curvature of the roof. Refer to Special features techniques for more information on shaping of battens. At the apex, where the radius is the smallest, it may be necessary to use 4 thicknesses of 6mm timber battens to achieve the flexibility to fit the curve. In this case the joints of the 6mm battens should be staggered.
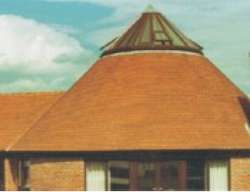 This photograph shows an example of a conical roof (Photograph courtesy of Sandtoft). Each course is a different width and this will require the tiles to be tapered to maintain the bond, or side lap. For example, a typical conical roof of 70 pitch may require three sizes of tapered tile – the first of 150mm width at the tail, the second of 125mm and the third of 100mm. To maintain an effective bond, or side lap, with the adjacent courses, the minimum possible width of tile is 81mm. It may be necessary to redrill appropriate nail holes on site for fixing. Depending on the radius of the curve it may not be possible to rely on the nibs for support therefore each tile should be twice nailed.
Purpose made tapered ‘peg’ tiles are available from some manufacturers for use on historical conical roofs, for example oast houses.