The following illustrations and text explain the common main vertical tile design details that can occur on refurbishment and new work to abutments
![]()
Vertical tiling junction with verge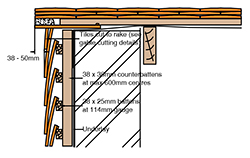
Extend underlay on main roof to overlap vertical underlay by a minimum 150mm. Ensure that verge undercloak extends a minimum 38 to 50mm beyond face of vertical tiling. Fix timber batten in line with rake of verge undercloak to provide fixing for cut vertical gable tiles. Cut tiles neatly to form detail at junction with verge undercloak.
Vertical tiling junction with side abutment
Extend underlay on main roof vertically up the wall by a minimum 50mm and overlap by vertical underlay.
The vertical upstands of the Code 3 lead soakers inserted between each course of roof tiles should be secured behind the battens/counterbattens of the vertical tiling.
Fix a timber tilt batten to the rake of the roof tiling to provide support for raking cut vertical eaves tiles.
Cut tiles neatly and as close to the main roof tiling as possible.
Swept tiling to top abutment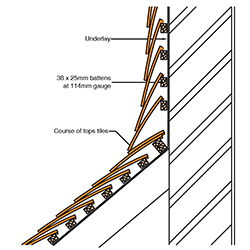
Extend underlay on main roof vertical up the wall by a minimum 50mm and overlap by vertical underlay.
Fix a double thickness of tiling battens at the top of the main roof slope and lay a course of tops tiles ‘piggy back’ and broken bonded with the standard tiles in the course below.
The bottom course vertical tiling batten should be fixed in position so as to allow the tail of a standard plain tile to rest on the front of the tops tiles.
Flashing to top abutment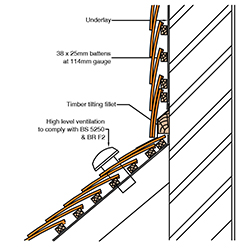
Extend underlay on main roof vertical up the wall by a minimum 50mm and secure under timber tilting batten.
Dress a Code 4 lead cover flashing over the top course of roof tiles and the tilting batten, carrying up under the underlay and secure behind the bottom vertical tiling batten.
The eaves course of vertical tiling should be positioned closely to the top course of roof tiles.
Ventilated flashing to top abutment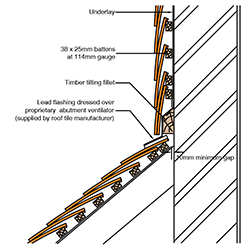
Cut back the underlay on the main roof to provide a minimum 10mm gap at the junction with the vertical wall.
Dress a Code 4 lead cover flashing over the proprietary abutment ventilator and the timber tilting batten, carrying up under the underlay and secure behind the bottom vertical tiling batten.
Position the eaves course of vertical tiling closely to the top course of roof tiles and ensure that a minimum 5000 sq mm per metre run air path is maintained.