Introduction
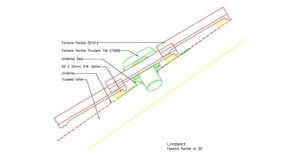
Pantiles are single lapped tiles that are becoming increasingly popular and are renowned for their distinctive “S” profile(s) that creates a series of rolls and troughs to produce one of the most elegant roofscapes available.
The pantile shape is predominant on the east side of England and Scotland as well as areas of the south coast of England and the south-west. This geographical architectural footprint is a legacy of several centuries of trading during which pantiles were brought back from The Netherlands and Belgium as ballast in trading ships.
While the traditional clay pantile is a single pantile with a single “S” profile with the right-hand edge turned down and the left hand edge turned up a related modern derivative is the double “S” profile. Single and double pantiles can be either non-interlocking (just overlapping) as per the traditional single clay pantiles or nowadays interlocking as well made of either clay or concrete.
With a traditional single clay pantile the top right hand corner and the bottom left hand corner are cut to a chamfer equal to the headlap and sidelap, with a nib and nail-hole fixing moulded into the top edge normally at the bottom of the trough, before being fired in a kiln. The traditional cut at the top right and bottom left is a straight line, but with some designs is a zigzag or a curve. Provided all the tiles have the same corner shape they will fit together. The cut starts along the top or bottom edge equal to the sidelap distance in from the edge. The cut finished down the side of the tile equal to the headlap distance. The angle of the cut will be dependent upon those two dimensions.
Tiling
Setting Out and Laying
In particular with clay pantiles due to the shrinkage during the drying and firing process in their manufacture there will often be more natural variation in the tile dimensions than with concrete tiles. Therefore the tiles have to be laid to create the best fit, and regardless of how good the tiles are there will be some gaps generated that will vary from tile to tile.
In terms of headlap many traditional overlapping pantiles due to the corner cuts have little or no batten gauge variance and for setting out purposes should be treated as fixed gauge tiles. This means that the same batten gauge is used up the length of the rafter and the last top course tile course in most cases will need to be cut (at the head of the tile) to size, nail-holes re-drilled and nailed/screwed into the top course tiling batten.
With traditional overlapping single clay pantiles it is also very important that perpendicular lines are struck prior to laying these tiles. Traditional pantiles which are not of the interlocking variety use the roll of the tile as the sidelap and as such the sidelap is essentially fixed and determined by the design of the specific pantile with little shunt available.
The best method of determining the batten gauge to be used is to take a random sample of 12 tiles and lay them along the ground upside down with all the tiles shunted in. A distance should be measured over ten tiles and divided by ten. The same process repeated with the tiles shunted out and again the distance measured over ten tiles divided by ten. The distance should be measured from nib face to nib face where possible. The average of the two figures then used to set out the batten gauge. The same process should be used to determine the coursing. Take the same 12 tiles and lay them along the ground lapping the sidelaps, first shunting them in and then shunting out, measuring over ten tiles divide by ten and average the result. The horizontal coursing should be marked on the battens from eaves to ridge onto the battens with a coloured chalk line every third or fourth tile to help maintain the perpendicular lines up the roof. When laying the tiles, the batten gauge and the coursing must be maintained and this will minimize problems. As each tile is laid, an assessment by the tiler should be made to ensure that each tile fits correctly and should reject any that do not. The rejected tiles can be used somewhere else where they fit better.
For pantiles of the more modern interlocking type the sidelap is dictated by the proprietary nature of the interlock and coverlock design and the setting out advice given in the sections discussing large format interlocking clay tiles (profiled or flat) and large format concrete interlocking tiles should be followed. Similarly the headlap variance is dictated by the proprietary nature of the interlocking tile design and features such as nail hole positions and design, weather bars etc can all influence the headlap variance possible.
In general modern interlocking pantiles tend to be designed to afford some headlap variance unlike traditional overlapping pantiles which have little or none but tile manufacturer guidance and technical recommendations should always be followed in any case.
Roof Details
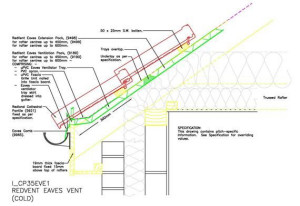
Ventilated Eaves
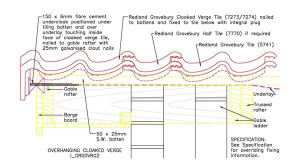
Cloaked Verge
Dry Verge

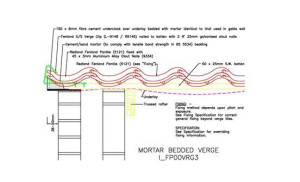
Bedded Verge
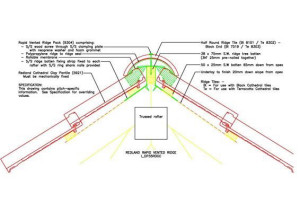
Dry Ventilated Ridge
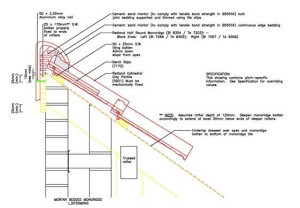
Bedded Monoridge
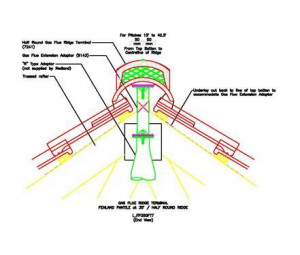
Gas Flue Ridge Terminal
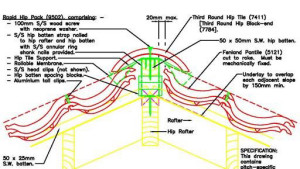
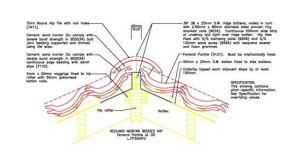
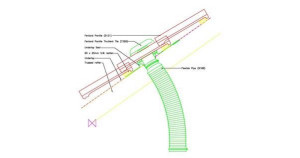
Dry Hip
Bedded Hip
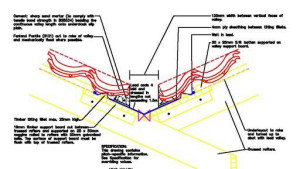
Lead Valley
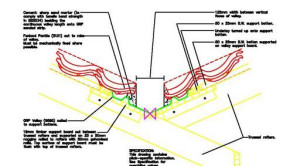
GRP Valley
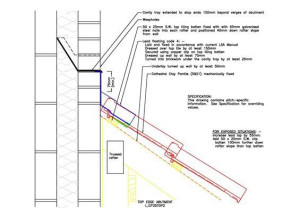
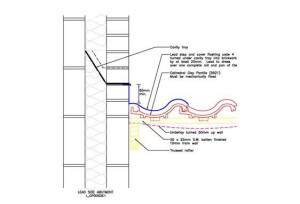
Top Abutment
Side Abutment
Ventilation Tile (connected to soil or mechanical extraction)
Ventilation Tile (for roof space ventilation)